fillGradients
A neat way to store and use fillGradients in custom property sets
by Hugh Senior
What's in this article?
-
Writing efficient code
- Choosing from alternatives
- Playing with graphic fills (i.e. fillGradient)
- Applying custom property sets
- Getting something useful at the end
Introduction
FillGradient is a marvellous way to colorize block graphics, but because the 'from', 'to' and 'via' coordinate properties are based on screen points, it only works if the graphic is in exactly the right place. This means that we cannot use fillGradients directly as template definitions, or even "set the fillgradient of grc 2 to the fillGradient of grc 1".
That's the problem... What if we want to store different fillGradients, and then apply them to re-skin any object in a project? FillGradient stores the coordinates in screen not object terms, so knowing the FillGradient without the original graphic rectangle is next to useless. To prove a point, try this:
1. Create a graphic called "My new grc", any size you like and placed anywhere on the card. Make sure it is opaque.
2. Now put this fillGradient spec into a button script...
on mouseUp
   put "linear" into myGradient["type"]
   put "0.0,242,242,242" &return& "1.0,192,192,192" into \
          myGradient["ramp"]
   put "230,100" into myGradient["from"]
   put "574,281" into myGradient["to"]
   put "230,281" into myGradient["via"]
   put "good" into myGradient["quality"]
   put "1" into myGradient["repeat"]
   put "false" into myGradient["mirror"]
   put "false" into myGradient["wrap"]
   set the fillGradient of graphic "My new grc" to myGradient
end mouseUp
3. Click the button. You might expect the graphic to display as I designed it. But you don't. You don't know where my original was located. And until you do, you won't see my lovely gradient fill. Bummer, huh? Delete the button; it doesn't work.
Finding a solution
Okay, we know why it doesn't work and what's missing: screen not object coordinates, and no reference coordinates. The easiest thing would be if the 'from', 'via' and 'to' coordinate properties in fillGradient were stored in a way that any graphic could use. But it doesn't work that way so we may as well roll up our sleeves and do a bit of coding. But that's fine... it's what we do, and it gives us a sense of satisfaction. There are two ways to deal with this problem:
The hard way - Calculate and store the relative offset values of all coordinates in 'from', 'via' and 'to', adjusting for any change in dimension, then replace the old coordinates with new values before applying the adjusted array.
The easy way - Cheat whenever possible and look for the path of least resistance.
If you'd like to try the first way, be my guest. What follows is the easy way.
Applying the solution in 4 steps 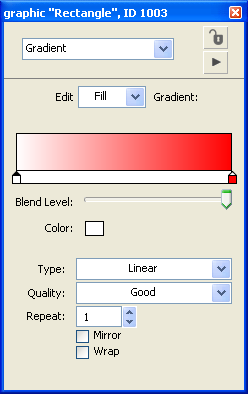
Step 1: Design a graphic with a fillGradient
Step 2: Grab its fillGradient array and include the original rectangle
Step 3: Save this as a definition spec where we can easily access it
Step 4: Apply the definition spec to another graphic and let LiveCode work out the details
Brief note on coding conventions: Use t for temporary variable names, p for parameters and a for array names. This makes understanding the code later very much easier, avoids conflicting names and is generally 'a good thing to do'.
Step 1: Design a graphic with a fillGradient
Using the same stack, create a second opaque graphic. Call it "original" and set its fillGradient as you wish. You can use the LiveCode IDE to help you… double-click the graphic, drop down the menu, select 'Gradient' and play with the options.
Step 2: Grab the array and include the original rectangle
Instead of storing the FillGradient in its native form, we are going to save a modified copy of it that includes the original reference coordinates. We tell LiveCode the name of the designed graphic (pSourceGrc) and what we want to call our spec (aSpecName):
put the fillGradient of grc pSourceGrc into aSpec
put the rect of grc pSourceGrc into aSpec["rect"]
We now have a modified version of the fillGradient array containing what we need.
Step 3: Save the text spec
The code in step 2 extracts a fillGradient spec and modifies it. We now have to store the modified spec somewhere persistent. Although there are lots of data storage options (a variable, a global, a script variable, a text file, a hidden field somewhere, a custom property, a custom property set, a file on the web), we have to choose one that can not only store arrays but also persist the next time we use the stack. The only options are a custom property or a custom property set. Knowing what your data storage options are and which one suits best will save you a lot of code re-writing later on when you realize you chose the wrong one and have to change it.
Thinking ahead, we will want to store lots of different fillGradients and possibly choose from different sorts of fill specs such as green fill specs, red fill specs, or blue fill specs. Our choice is therefore a custom property set. This saves the spec (aSpec) by name (pSpecName) in a persistent custom property set called 'myFillGradients':
set the myFillGradients[pSpecName] of this stack to aSpec
Put these together in one handler and put the handler in the stack script:
on saveFillGradientSpec pSourceGrc,pSpecName
put the fillGradient of grc pSourceGrc into aSpec
put the rect of grc pSourceGrc into aSpec["rect"]
set the myFillGradients[pSpecName] of this stack to aSpec
end saveFillGradientSpec
Step 4: Apply the definition spec to another graphic
Now we find the line of least resistance. This handler resizes the required graphic to the dimensions of the original so the fillGradient will apply as expected. It then restores the graphic to its original place and we let LiveCode do the work of re-calculating the 'from', 'via' and 'to' coordinates which are, frankly, of no real interest to us any more:
on setFillGradientSpec pDestGrc,pSpecName
put the rect of grc pDestGrc into tRestoreRect
lock screen
put the myFillGradients[pSpecName] of this stack into aSpec
set the rect of grc pDestGrc to aSpec["rect"]
set the fillGradient of grc pDestGrc to aSpec
set the rect of grc pDestGrc to tRestoreRect
unlock screen
end setFillGradientSpec
Finally...
All the preparatory work is now done and we can actually use it.
You already have an opaque graphic called "Original" with its fill gradient displayed. Now create a field called "SpecName" and a button called "SaveSpec". Put this handler into the button script to save the fillGradient:
on mouseUp
put fld "specName" into tSpecName
put "Original" into tSourceGrc
saveFillgradientSpec tSourceGrc,tSpecName
end mouseUp
You already have an opaque graphic called "My new grc". Now create a button called "SetSpec". Put this handler into the button script to set the fillGradient:
on mouseUp
put fld "specName" into tSpec
put "My new grc" into tGrc
setFillGradientSpec tGrc,tSpec
end mouseUp
That's it. You can now grab and store the fillGradient of any graphic as a usable spec, then retrieve the spec and apply it to any other graphic. To store different specs and apply them at any time, change the fillGradient of the original and call the spec something different.
Of course you will probably have a SaveSpec utility card somewhere and use "setFillSpec" in a more convenient way than "mouseUp", but you have all you need to skin objects based on fillGradients.
Something for the weekend?
Custom property sets are a marvellous way to store data, not least because it immediately offers two tiers of storage: As many custom property sets as you want, and for each one as many custom properties as you want (called the custom keys). That's why I chose this method of storage for fillGradients. With extension, different spec sets of specs can be available and all very quickly implemented.
What to do next to learn more about fillGradient and custom property sets…
on mouseDown
set the custompropertyset of this stack to "myFillGradients"
get the customkeys of this stack
set the custompropertyset of this stack to ""
put it into me
end mouseDown
on menuPick what
put what into fld "SpecName"
send "mouseUp" to btn "SetSpec"
end menuPick
Over to you…
- You could add the ability to remove a spec from the myFillGradients custom property set.
- Write a handler that allows you to edit, try out and save a spec manually.
- Extend the single myFillGradients to multiple sets of specs.
Hugh Senior
www.FlexibleLearning.com
|