Cannonball Tutorial! Part 1.1 | Part 1.2 | Part 2.1 | Part 2.2 | Part 3.1 | Part 3.2
Part 4.1 | Part 4.2 | Part 5.1 | Part 5.2 | Part 6.1 | Part 6.2
We should make sure that we will understand the program in the future.
There are several items:
- a user guide
- a programmer's guide
- diagrams
- comments in the code
The User Guide
For this program, the user guide can be a simple piece of text with a single image in it:
User Guide
Cannon allows you to see the trajectory made by a cannonball.
The screen looks like this (just after pressing "Fire!"):
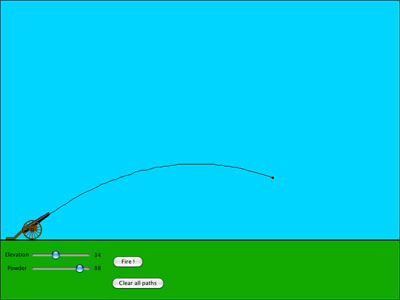
There are two controls:
- the elevation of the barrel, which you can set with a slider to values between 0 degrees(horizontal) and 90 degrees(vertical)
- the amount of powder used, which you can set with the second slider to values between 0 and 100.
Pressing the button labelled "Fire !" will then show how the cannonball moves with that elevation and amount of powder.
Pressing the button labelled "Clear all paths" will remove all paths you have drawn and start with a clean sky.
OK, so that was not very painful. It is a good idea to write a user guide, so that others can use the program too, and you yourself have some understanding of what it is supposed to do. You would be surprised how much you learn yourself just from trying to explain to someone else what it is you want a program to do.
The Programmer's Guide
We will not write the programmer's guide here, because all the pages you read until now are in fact a very detailed programmer's guide.
Diagrams
These too we will not make, because the previous pages contain them.
It is difficult to put adequate diagrams into the program code. It is better to keep them in some graphics notation such as SVG or PDF, and just refer to them from the programmer's guide or from the documentation. Another good way of course is to make web pages because then you can easily combine the text and graphics and alos make links!
Comments in the code
Let's do the scripts one by one.
Remember that a script can contain many handlers, though in our case each script has only one.
We begin with the property handler of the barrel. There is one important thing to point out: that the formattedwidth must be used. We change the handler to:
getprop pNozzleLoc
put the pElevation of me into lElevation
put item 1 of the loc of me into lCentreX
put item 2 of the loc of me into lCentreY
put ( the formattedwidth of me )/2 into lLength
put lCentreX + lLength*cos(lElevation*pi/180) into lNozzleX
put lCentreY - lLength*sin(lElevation*pi/180) into lNozzleY
return round(lNozzleX),round(lNozzleY)
end pNozzleLoc
Note how I've put a "block of comments" in front of the handler to summarise what it does and why.
Also note that I put the handler's name in bold, so it is easier to spot. This is especially useful if there are many handlers in a script, and I will do this from now on.
Now the setting of the elevation:
onScrollbarDragfValue
settheangleofimage"CannonBarrel.png"tofValue
set the pElevation of image "CannonBarrel.png"tofValue
put fValue into field "Elevation"
end ScrollbarDrag
I have taken the opportunity to put the two lines affecting the image together and that affecting the field last. This is more logical. Personally, I don't like these three lines of comment: they just repeat what the program already says quite clearly. Transcript is good enough in itself in most cases. The only real point is perhaps the creation of the custom property for use by others.
You could leave all three comment lines out and I would not be unhappy. However, the clarity of the Transcript code is helped a lot by the good choice of names: we were the authors of the names Elevation and CannonBarrel.png. Maybe we should change the rather meaningless name fValue to the more meaningful name fSliderButtonPosition.
The other slider is similar:
onScrollbarDragfValue
put fValue into field "Powder"
set the pPowder of image "CannonBarrel.png" to fValue
end ScrollbarDrag
The Fly handler is the most difficult. We don't really want to explain all about simulation of physics.
on Fly fVx,fVy
put 0.5 into lk1
put 0.5 into lk2
put 0.5 into lA
put item 1 of the loc of me into lX
put item 2 of the loc of me into lY
put lX into lOldX; put lY into lOldY
if there is no image "Path" then
create image "Path"; set the rect of image "Path" to the rect of this card
end if
choose line tool
repeat until lY >= the top of graphic "Grass"
set the loc of me to round(lX),round(lY)
drag from round(lOldX),round(lOldY) to round(lX),round(lY)
put lX into lOldX; put lY into lOldY
add fVx*lk1 to lX
subtract fVy*lk1 from lY
subtract lA*lk2 from fVy
wait 1 ticks
end repeat
choose browse tool
end Fly
The most important comments are about the Path image and about hitting the grass.
I wrote: For simulation of motion see elsewhere. That's cheating a little, because I should at least give some more specific hint, for example a URL of a tutorial on the web, the name of a document on my own computer where I keep notes about simulation, or something of that kind.
You can add a line of comment to the handler of the Clear all paths button if you want, and then we are finished.
You can read the summary to recapitulate what we learned in this tutorial (a lot!!).
Cannonball Tutorial! Part 1.1 | Part 1.2 | Part 2.1 | Part 2.2 | Part 3.1 | Part 3.2
Part 4.1 | Part 4.2 | Part 5.1 | Part 5.2 | Part 6.1 | Part 6.2
|