Advanced Multimedia with Rev 4.0
How new graphics effects can enliven both planets and
haggis
One of the thoughtful new touches in Revolution 4.0 is a collection of new graphics effects. More than just "eye candy" these effects can save you quite a bit of time as you build dynamic user interfaces with Rev. At our RunrevLive.09 developers conference, Rev product manager Ben Beaumont gave attendees a tour of the new graphics effects as applied to both standard controls and some fanciful objects within and outside the known universe.
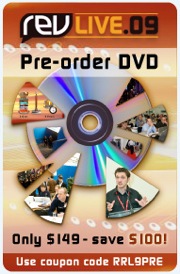
Ben's presentation, along with dozens of others, is available on our brand-new RunRevLive.09 DVD set (available for pre-order here). You can see excerpts of his presentation on our new YouTube channel here. And best of all, you can try them out for yourself right now, either using the dp-4 preview release of revEnterprise (if you have a current license), or using the free revMedia alpha, here.
You'll save a lot of time if you also download Ben's demo stack, available here.
If you've been using Rev for a while, you'll know that it has some fairly basic capabilities in regard to graphics. You can drag out a graphic object from the tools palatte, set its size and position, change shape, add gradients, and well, take it into Photoshop to really pretty it up and make it look professional. Right? Wrong! Not any more. Rev 4.0 brings you a whole slew of really professional effects, allowing you to create a beautiful interface without ever leaving your comfort zone. Here's a screenshot showing what I mean:
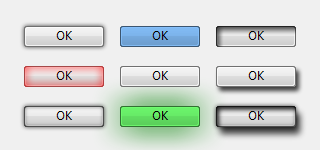
The center button is the standard, unadorned operating system push-button. Surrounding it are a variety of effects that were previously possible only by exporting the button to a graphics program and applying filters. In Rev 4.0, you can now programmatically define these appearances on-the-fly, at runtime. These effects can be applied to any object in your Rev stacks, even bitmap images.
In creating his demo stack for the conference, Ben has used many of the new effects, to give it a tangible, 3D, polished look. The titles have a slight glow, the status bar is beautifully curved, if you download the stack and click the buttons you'll see they have colours and shadows applied in differents states. The result is to make this stack something you really want to possess. Lets look in a bit more detail at how Ben has done this, and how you can use the new effects yourself to make your own projects really dynamic and desirable.
The best thing about the new graphics effects is that it saves you time. In the past, when you wanted to create a series of button states for rollovers and mouse presses -- especially if they involved tints of color or realistic drop shadows -- you had to create those effects in a different program and use images (transparent PNGs, typically) to present them in Rev. If you decided to rename a button, you might have to recreate those various states, requiring more time. The new graphic effect obviate the need for this process:
- You can use the Color Overlay effect to change the hue of buttons
- You can use Inner Glow and Outer Glow to indicate activity or clickable objects
- You can use Drop Shadow to create a sense of depth
And that's just the beginning. The new effects live in the Graphic Effects pane of the Property Inspector:
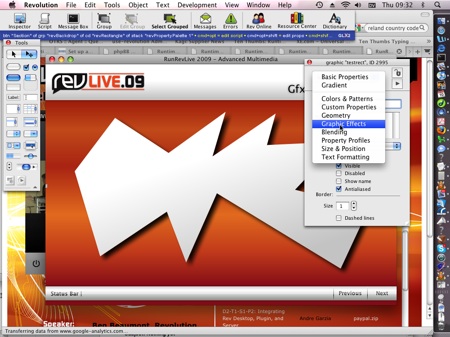
To bring up the property inspector, make sure you are in edit mode (the arrow with the plus next it at the top of the tools palette), then double click on the object you want to apply an effect to. Select "graphics effects" from the drop down menu. Now you can really start playing about with the new effects. Here's a quick rundown on what they do:
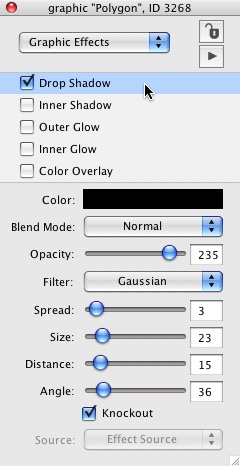
Select the effect you want to use from: drop shadow, inner shadow, outer glow, inner glow and color overlay.
Multiple effects can be applied at the same time to an object. The check boxes show you which ones are active, and the line highlight indicates which one you are modifying.
Outer glow and drop shadow create a blended effect on the outside of the object, giving a sense of it being raised above the background. Inner glow and inner shadow cause a blended effect on the inside of an object and can be used to create a sense of depth or give an object a subtle 3D appearance.
Color overlay tints the object with a single color over the entirety of
it, with a blend-level, perfect for dynamic hover states. See this
demonstrated on the haggis card: 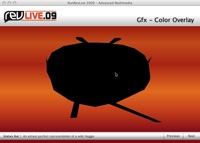
[Note: a wild haggis typically has one leg longer than the other in order to balance on the steep, Scottish hillsides. They can come in many colours, so do experiment with the colour overlay to see what this one looks like in pink, red or blue.]
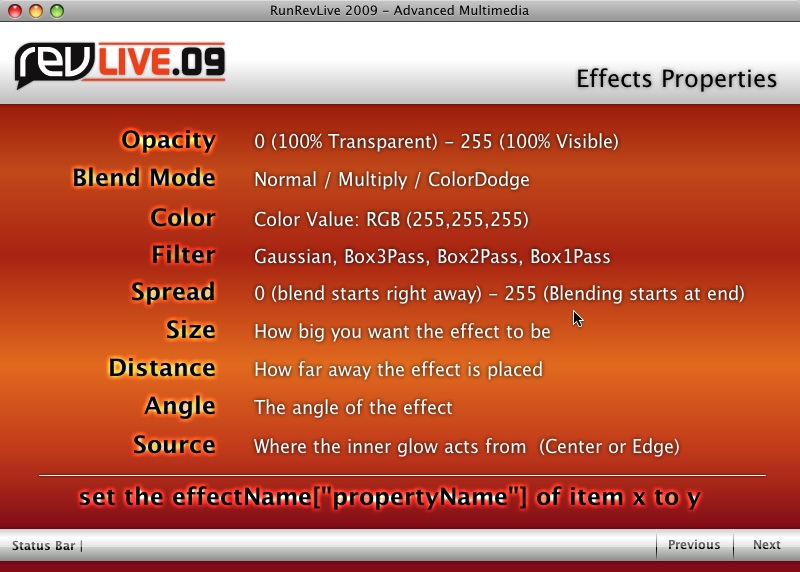
A couple of the more mysterious items on the Graphic Effects pane might be "Filter" and "Knockout". Filter is essentially where you set the quality of the effect. Gaussian is best quality, but uses more resources, box 3, 2 and 1 are successively less resource-hungry and rougher quality. Knockout indicates whether transparent and semi-transparent regions of the interior of an object are excluded from the effect or not. In the image below, the lens is semi-transparent. You can see that applying the knockout makes the lens less dark:

The different properties you can apply to these effects are nicely explained on the card titled "Effects Properties". A few notes on these. Blend mode includes:
Normal - This is the default, the effect will not be affected by the background. Mulitply - The colour of the effect is darkened based on the background color. ColorDodge - Ben gets quite excited about ColorDodge. It is used to create the illusion of light, the effect interacts with the background by lightening it and increasing it's vibrancy. Similar to a flash light being shone onto a wall in a dark room, the true vibrant color of the wall is revealed.
So, that's the basics. If you watch the entire session on DVD, you will get somewhat more detailed explanation from Ben, but I have only limited space here. What can you do with these new effects? Can they, for example, be scripted? The answer is yes, all these effects can be fully controlled in your scripts. Here is the script for the pulsing button on the card titled "Advanced effects on buttons":
local tSize, tDirection

on mouseEnter
   # Set the pulse speed and animation basics
   set the idlerate to 40
   put "up" into tDirection
   put 1 into tSize

   # Apply the outer glow (we'll only change the size in the
   # next handler)
   lock screen
   set the outerglow["opacity"] of me to 255
   set the outerglow["color"] of me to "0,0,0"
   set the outerglow["size"] of me to tSize

   set the colorOverlay["color"] of me to "0,0,0"
   set the colorOverlay["opacity"] of me to "45"
   unlock screen

   # Update the status to tell the user what we are doing
   statusSet \
          "Sets an orange outerGlow that pulses when the mouse is over the button"
end mouseEnter

on mouseLeave
   # When the mouse leaves the buttons we simply clear the effect
   set the outerGlow of me to empty
   set the colorOverlay of me to empty
   statusClear
end mouseLeave

on mouseWithin
   # Increment / decrement the size of the glow
   if tDirection is "up" then
      add 1 to tSize
   else
      subtract 1 from tSize
   end if

   # Calculate the new direction of the pulse
   if tSize > 20 then
      put 19 into tSize
      put "down" into tDirection
   else if tSize < 0 then
      put 0 into tSize
      put "up" into tDirection
   end if

   #Set the new size of the glow
   set the outerglow["size"] of me to tSize
end mouseWithin
As you can see, its pretty straightforward and self expanatory. The end result is a button with an outerglow that pulses when you mouse over it. Play about a bit with the buttons on this page - the inner ease effect is particularly effective.
Ben winds up with a demonstration of how he applied a variety of these effects to his animated planets, to great dramatic effect.
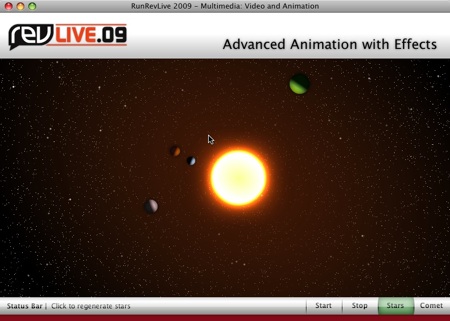
His sun is created using the colorDodge effect to make it really shine. The planets as they rotate around the sun have rotating gradients applied so that the "light" from the sun apparently lights up the correct side. The stars in the background are all individual objects with outer glows applied. You can see the effect in our youtube video here. This video is of course lower quality than the DVD will be, to allow for fast distribution via youtube.
The whole of this session, as well as Ben's exciting animation tutorial, and all the other great content from RunRevLive.09 will be available on DVD shortly. We are already taking pre-orders at a substantial reduction on what will be the full sale price when the DVD is actually published.
 |
|


 |
RunRevLive.09 |
|
Advanced Multimedia |
|
RR Sponsors Training |
|
RR on Facebook and Twitter |